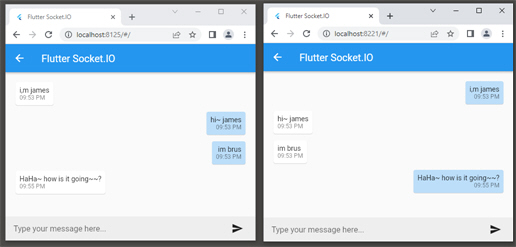
[socket.io] Flutter + NodeJS(socket.io)
페이지 정보
작성자 sbLAB 댓글 0건 조회 2,483회 작성일 23-04-23 23:52본문
Socket.IO
https://socket.io/docs/v4/server-api/
https://poiemaweb.com/nodejs-socketio ★
필요 라이브러리 설치
npm install socket.io express
npm install -g nodemon
npm start
[socket.io.js]
http://localhost:3000/socket.io/socket.io.js
*!
 * Socket.IO v4.6.1
 * (c) 2014-2023 Guillermo Rauch
 * Released under the MIT License.
 */
(function (global, factory) {
  typeof exports === 'object' && typeof module !== 'undefined' ? module.exports = factory() :
  typeof define === 'function' && define.amd ? define(factory) :
  (global = typeof globalThis !== 'undefined' ? globalThis : global || self, global.io = factory());
})(this, (function () { 'use strict';...[Serve app.js] - nodeJs
const express = require('express');
const app = express();
const http = require('http');
const server = http.createServer(app); //Express를 사용하여 Http 서버 생성
const { Server } = require("socket.io");
const io = new Server(server); //http server를 socket.io server로 upgrade
const messages = []
// connection event handler
// connection이 수립되면 event handler function의 인자로 socket이 들어옴
io.on('connection', (socket) => {
const username = socket.handshake.query.username
console.log("handshake username:"+username+"--ID"+socket.id); //handshake username:222--IDemvTy_N6WEsQD9gpAAAB
//클라이언트가 전송한 메시지 수신, 현재 접속되어 있는 클라이언트로부터의 메시지를 수신하기 위해서는 on 메소드를 사용
//클라이언트가 메시지 송신 시 지정한 이벤트 명 'message' (string)
//이벤트 핸들러, 핸들러 함수의 인자로 클라이언트가 송신한 메시지가 전달
socket.on('message', (data) => {
const message = {
message: data.message,
senderUsername: username,
sentAt: Date.now()
}
messages.push(message)
//클라이언트에게 메시지 송신
io.emit('message', message) //이벤트 명(message), 송신 메시지(string or object)
//접속된 모든 클라이언트에게 메시지를 전송
//io.emit('event_name', msg);
//메시지를 전송한 클라이언트에게만 메시지를 전송
//socket.emit('event_name', msg);
//메시지를 전송한 클라이언트를 제외한 모든 클라이언트에게 메시지를 전송
//socket.broadcast.emit('event_name', msg);
//특정 클라이언트에게만 메시지를 전송한다
//io.to(id).emit('event_name', data);
})
});
server.listen(3000, () => {
console.log('listening on *:3000');
});
[Flutter Client]
@override
void initState() {
super.initState();
//Important: If your server is running on localhost and you are testing your app on Android
then replace http://localhost:3000 with http://10.0.2.2:3000
_socket = IO.io(
IO.OptionBuilder().setTransports(['websocket']).setQuery(
{'username': widget.username}).build(),
);
_connectSocket();
}
@override
void dispose() {
_messageInputController.dispose();
super.dispose();
}

참고
[Serve app.js] - 같은 동작 + public/index.html 페이지 추가
const express = require('express');
const http = require("http");
const app = express();
const path = require("path");
const server = http.createServer(app);
const socketIO = require("socket.io")
const io = socketIO(server);
app.use(express.static(path.join(__dirname, "public")));
const PORT = process.env.PORT || 3000;
const messages = []
io.on('connection', (socket) => {
const username = socket.handshake.query.username
console.log("handshake username:" + username + "--ID" + socket.id); //handshake username:222--IDemvTy_N6WEsQD9gpAAAB
socket.on('message', (data) => {
const message = {
message: data.message,
senderUsername: username,
sentAt: Date.now()
}
messages.push(message)
io.emit('message', message)
})
});
server.listen(PORT, () => console.log(`Server listening on ${PORT}`));
첨부파일
- nodejs_socket.io_flutter_chat.zip (797.2K) 4회 다운로드 | DATE : 2023-04-23 23:52:08
댓글목록
등록된 댓글이 없습니다.

